iPhone Senior Mode: A Guide to Assistive Access
At The Senior List, we have often touted the many benefits of iPhones for seniors. Between video calls, internet browsing, and high-definition photos, an iPhone is an ideal way to communicate and be entertained. However, for the uninitiated, the iPhone’s plentiful features present steep learning curves, not to mention how its crowded menus and small touchscreen buttons can pose problems for those with manual dexterity issues.
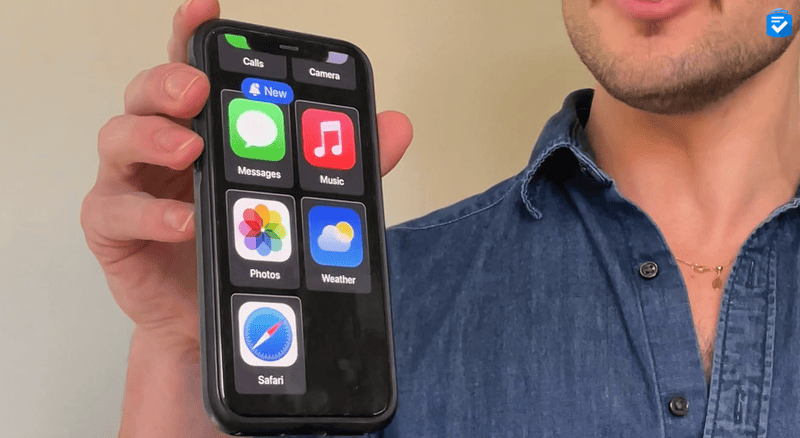
To address these troubles, Apple has released a new feature that some are dubbing “Senior Mode.” Officially called “Assistive Access,” this new feature allows you to streamline the layout of an iPhone, enlarging home screen buttons, simplifying controls, and limiting access to certain apps. If the traditional iPhone is proving too complicated for your loved one, then Assistive Access might just solve their troubles.
In this guide, we’ll walk through the basics of Assistive Access mode, including how to set it up, how to fine-tune its features, and how it changes the interface of your iPhone.
Want to pair an iPhone with a carrier for as low as $20 per month? Then read our guide to discounted phone plans for seniors.
What Is iOS Assistive Access?
Assistive Access –– colloquially called “Senior Mode” –– is a new iOS feature that makes it easier for people to independently use an iPhone. While the features of Assistive Access are highly customizable, its overarching benefit is to simplify the iPhone experience.
Many people have touted the benefits of this feature for older adults. In reality, it’s ideal for those with cognitive impairments, manual dexterity issues, or even those who want a pared-down version of an iPhone.
>>Read more: The Best Phones for Visual Impairment
Through our extensive use of Assistive Access, you can break down its benefits into three main categories.
Simplified Home Screen
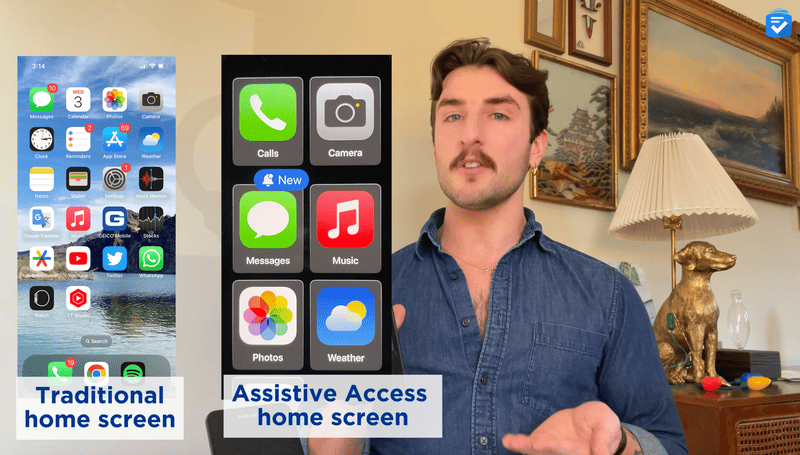
The standard iPhone home screen can contain upward of 20 apps. Swiping to the left brings you to additional screens with additional apps. Swiping downward can initiate a search. Swiping downward (from the top-right edge of the screen) opens your control center, and so on. While all of these gestures are second nature to seasoned iPhone users, for the uninitiated, it’s incredibly easy to get confused or lost on the phone.
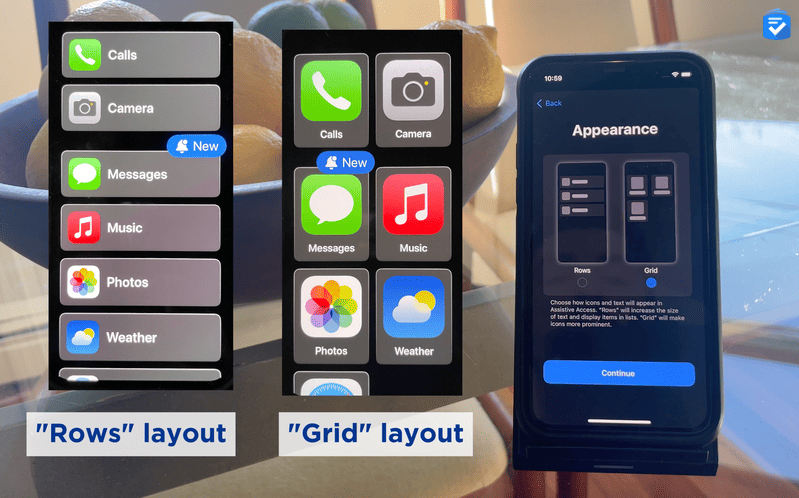
With Assistive Access, you can pare down the home screen to its basics, displaying apps in either a simple row format or in a large tile format. Assistive Access will also limit swiping gestures, preventing the user from unintentionally launching different menu screens.
Did You Know? The popular Jitterbug Smart4 is actually an Android phone with a simplified interface. To learn more about this phone, read our full Jitterbug Smart4 review.
Streamlined Apps
As well as simplifying the home screen, Assistive Access can also simplify the interface of different apps. As of this writing, Calls, Messages, Camera, Music, and Photos are optimized for Assistive Access. Further in this guide, we dive into exactly how Assistive Access changes each of these apps.
>>Learn more: The Best iPhone Apps for Seniors
Currently, only those five apps are optimized for Assistive Access. So while a person can still use other apps in Assistive Access mode, these apps will have their standard interfaces, rather than the streamlined Assistive Access versions.
Dedicated “Back” Button
If you’ve ever given an iPhone to a newbie, then you likely understand how easy it is to wander down a rabbit hole of apps and menus. One second, you’re showing your mother vacation photos from Costa Rica, and the next thing you know, she has somehow navigated over to your crypto wallet.
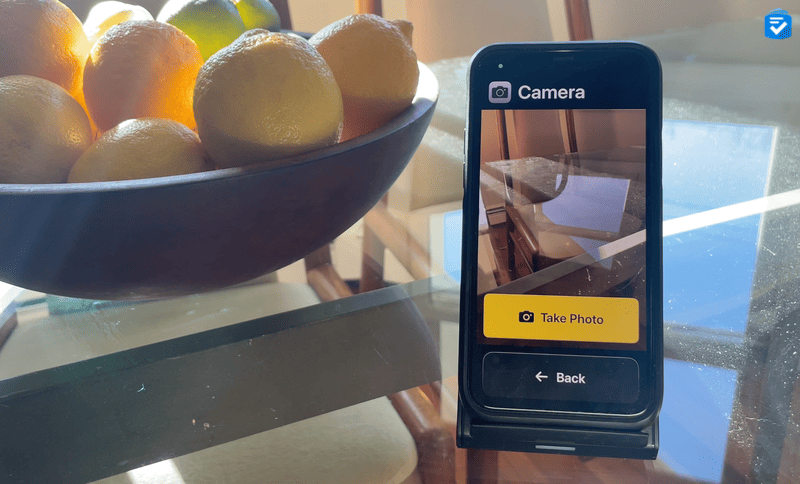
With Assistive Access turned on, there will always be a large, dedicated back button at the bottom of the iPhone’s screen, making it easy to exit apps and return to the home screen.
Our Video Rundown
In this video, our Managing Editor Ryan Molloy walks you through everything you need to know about Assistive Access.
How to Set Up Assistive Access
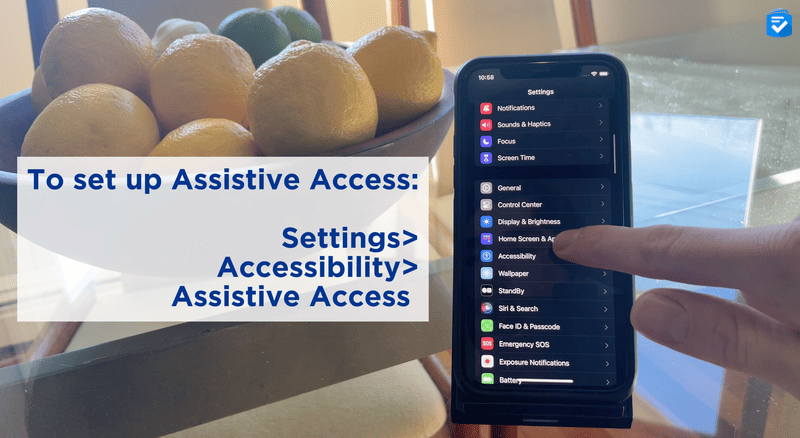
To set up Assistive Access Mode, you’ll need to first update your iPhone to iOS 17. This can be accomplished by going to Settings, then tap General, then Software Update. Updating to the new iOS can take upward of an hour, and you’ll most likely want to charge the phone while doing this.
Once you’ve updated to iOS 17, you’ll want to go back to Settings. Then scroll down to Accessibility, tap that, and then toward the bottom, under the General header, you should see an Assistive Access button. Click on this, then click Set Up Assitive Access, then click Continue.
Here, you’ll be prompted to verify the user’s Apple ID. If you’re setting up Assistive Access for a loved one, be sure that you use their Apple ID and not yours; otherwise, you risk sharing all of your contacts, photos, and other cloud files with the new user. I’ve got some horror stories from back in the day, when my mother, sister, and I all shared the same Apple login, but those are for another day.
After you confirm your Apple ID, you get to choose the layout for your apps on the home screen. Here, you’ll have two options. The first one is Rows, which displays all of your apps in a list form. The next one is a grid, which is almost like the traditional iPhone layout but with much larger icons.
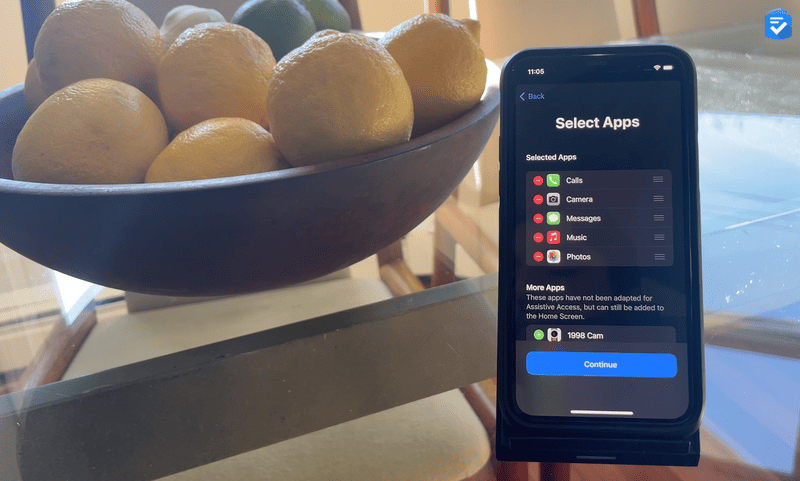
Next, you can choose which apps are available in Assistive Access mode. As of this writing, only Calls, Camera, Messages, Music, and Photos are currently optimized for Assistive Access mode. This means that only these apps have compatible simplified layouts. That said, you can enable other apps in Assistive Access mode, but they won’t have a simplified layout.
After you’ve set up your apps, you’ll want to verify the device’s passcode. If you’re setting up a phone for a loved one, you’ll want to make sure they know this passcode, as they’ll need it to unlock their device. You can also set up a face or touch ID here, depending on the model of your phone.
Next, you’ll want to set up a separate Assistive Access passcode. Unlike the device passcode, which you’ll want to share with the user, you’ll want to keep the Assistive Access passcode to yourself, as this is the passcode that you can later use to turn Assistive Access mode off or on.
To exit Assistive Access mode at any time, there are two ways, depending on your device. If you have an iPhone with Face ID, you triple-click the side button. On other phone models, you triple-click the home button. Either way, you’ll be prompted to enter your Assistive Access code to confirm.
Finally, you’ll be prompted to activate the feature. Click on the blue button, enter the Assistive Access code, and your phone is now in Assistive Access mode.
Assistive Access Mode Apps
At the time of this writing, the only apps that support Assistive Access mode are Calls, Messages, Camera, Music, and Photos. However, this does not mean that you can’t access other apps in Assistive Access mode. In fact, you can enable any app in this mode. It’s just that when the user opens the app, it will have the normal interface which, depending on the user, might not be what you want.
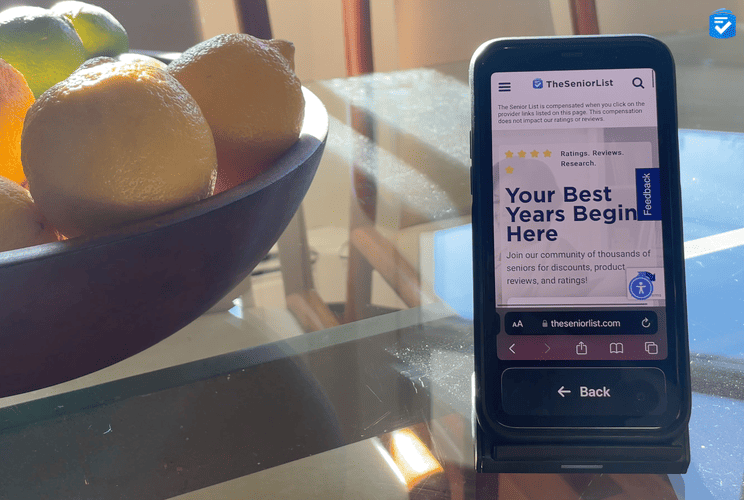
So, this is something you’ll want to remember when setting up Assistive Access mode for a loved one: You could enable the Safari browser, but the app has yet to be optimized for Assistive Access. I think that, as Assistive Access mode grows more popular, we’ll see a lot more apps of all stripes creating simplified versions for assisted access mode.
Calls With Assistive Access
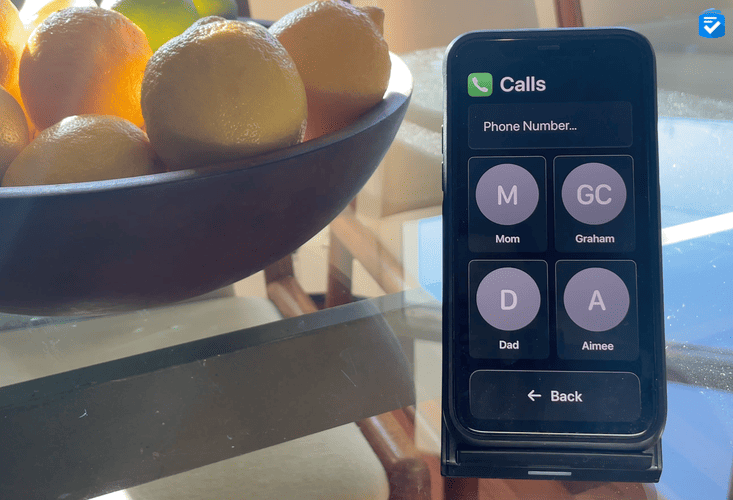
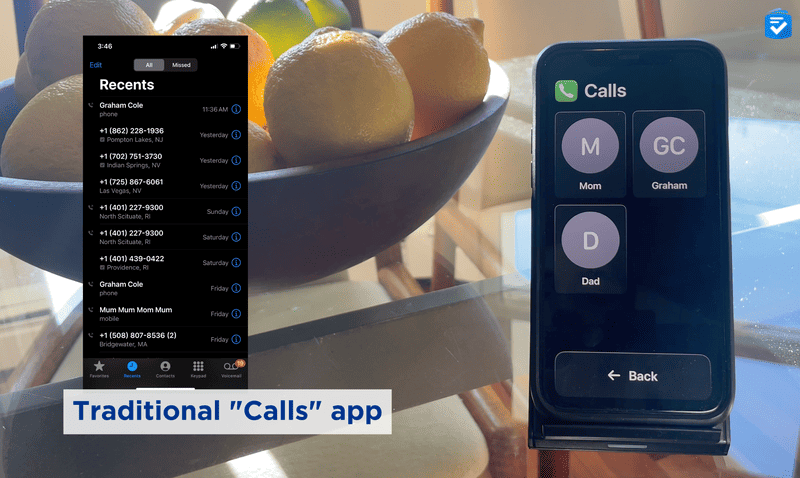
With Assistive Access on iPhone, the Phone and FaceTime apps are combined into a single Calls app. A person using Assistive Access can use the Calls app to make voice or FaceTime video calls to contacts compared to the standard Calls app, which has favorites, recents, contacts, etc., which just displays a list of contacts. When you click on a contact, you’ll have the option to place either a voice or video call.
Like many of the Assistive Access features, the front end is highly simplified; however, you can customize the interface to a great degree on the back end. If we exit Assistive Access mode and go back into it in the phone’s settings, we can adjust a number of things.
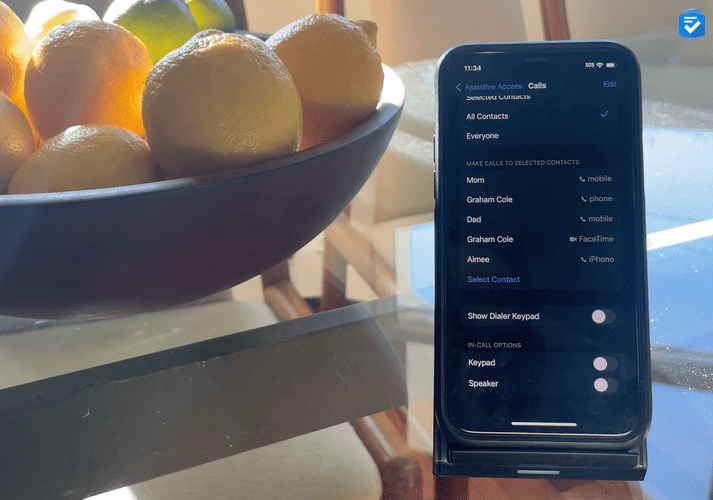
Receive Calls From: This allows the person using Assistive Access to receive calls from everyone, from all contacts in the Contacts app or from selected contacts only.
Make Calls to Selected Contacts: Choose the specific contacts the person using Assistive Access can call. When you select a specific contact, choose Call or Video (depending on how the person using Assistive Access wants to contact them), then choose a number or email address to call.
Show Dialer Keypad: This allows the person using Assistive Access to make calls to anyone by entering a phone number. When I toggle this on, there will be an actual numerical keypad as opposed to just a list of contacts.
Camera With Assistive Access
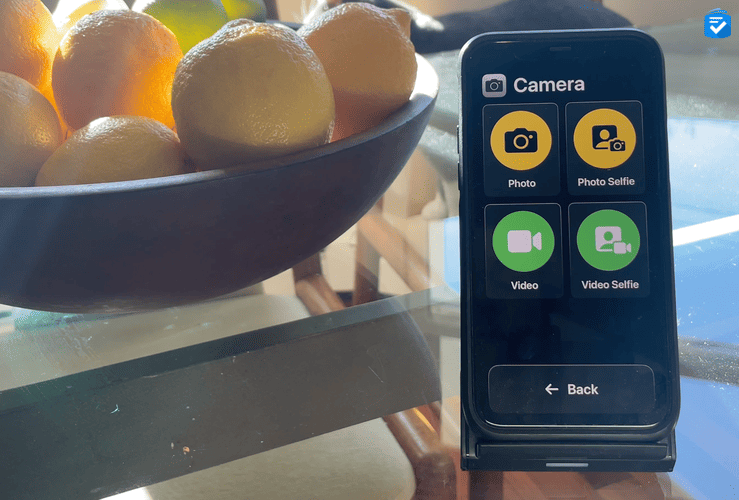
In Assistive Access, the camera is also simplified. When you open the camera app, you’ll see four options — Photo, which will take a front-facing photo; Photo selfie, which will take a selfie; Video, which will take a front-facing video; and Video Selfie, which will take a video selfie.

In addition to enlarging the buttons, Camera in Assistive Access has a streamlined interface. For example, swiping on the camera field of view in standard mode will allow a person to adjust the camera mode, lighting, or aperture. With Assistive Access, swiping does nothing.
Photos With Assistive Access
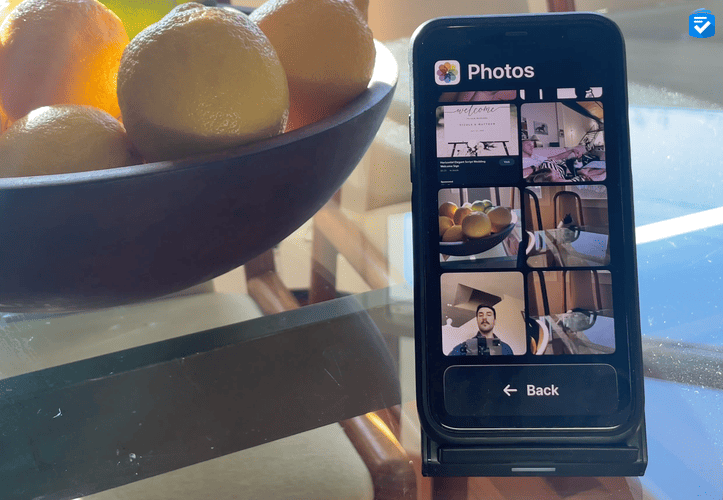
So, after you take photos with your phone, they’ll all appear in the photos app. Here’s what that looks like in Assistive Access mode. Compared to the normal photos app, the photo tiles are much larger. Notice how, unlike the standard photos app, there are fewer controls for albums, searches, and other features.
Unlike the Camera and Calls app, there’s not so much you can really change on the back end here; however, you can change settings related to shared albums.
Messages With Assistive Access
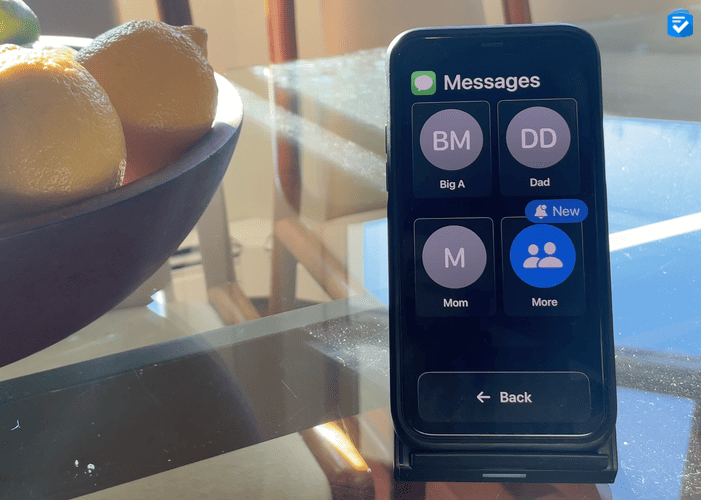
One of the most effectively streamlined apps in Assistive Access mode is the messages app. When you open it, you’ll see a list of your contacts. When you choose a contact, it opens to the message thread. Here, you can type out your message in one of three ways — with the standard keypad, the emoji keypad, or a video selfie.
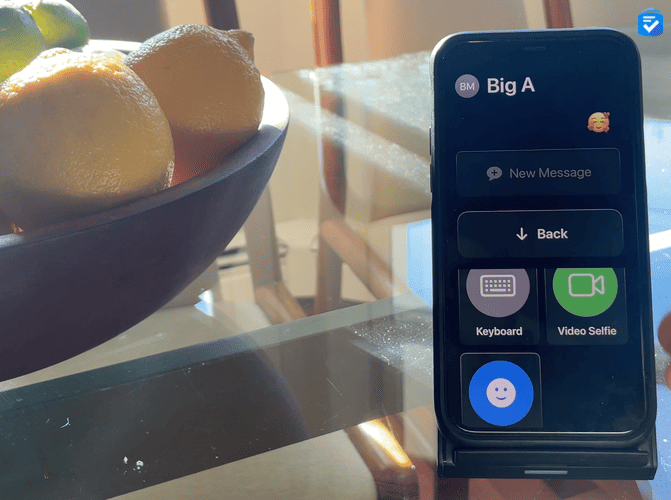
There’s also a lot of customization on the back end:
Receive Messages From: This allows the person using Assistive Access to receive messages from everyone, from all contacts in the Contacts app, or from selected contacts only.
Send Messages to Selected Contacts: This allows you to choose the specific contacts the person using Assistive Access can send messages to.
Tap to Hear Message: This allows the person using Assistive Access to tap messages to hear them read out loud. This may be useful for people who prefer audio communication rather than text.
Conversation Details: This allows the user to see details about messages in a conversation, such as dates and delivery status.
Keyboard: This allows you to send text messages using a standard keyboard.
Video Selfie: This allows you to send video messages using the front-facing camera on your iPhone. This may be useful for people who prefer audio or visual communication rather than text.
Emoji: This allows you to send emoji messages using an emoji-only keyboard.
Music With Assistive Access
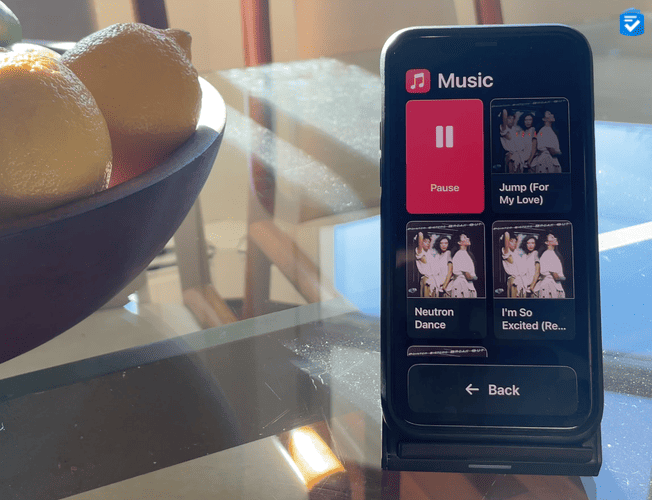
The music app is also streamlined for Assistive Access mode; however, there are some restrictions. With Assistive Access mode, the person using the phone will only have access to playlists and songs that you add on the back end. They won’t be able to pull from the infinite library of Apple Music. Above, you can see our limited music selection of Pointer Sisters tracks.
To change the playlists, you can exit Assistive Access, go back in through the settings, and here you can create new playlists, label them and add them.
The process of playing music is also simplified. To play a song, you click on the icon. To pause it, you press the large red Pause button, and to adjust the volume, you can use the volume rocker located on the side of the phone.
Assistive Access and Other Apps
With Assistive Access on iPhone, you can add apps that are specially designed for Assistive Access, like Calls, Camera, Messages, Music, and Photos. You can also add other iOS apps; however, these non-optimized apps will be in their original form.
So, for example, let’s say I want to access the Spotify app during Assistive Access mode. I can certainly do this. BUT when I open the Spotify app, the interface will be the regular Spotify interface. The same goes with the Safari browser, the weather app, and anything else.
I predict that, if Assistive Access grows in popularity, more apps will begin to create interfaces that are compatible with it. Until then, only Music, Photos, Messages, Camera, and Calls are compatible.
Additionally, you can’t add the App Store to Assistive Access. To get new apps from the App Store, you need to exit Assistive Access if it’s active.
Closing Thoughts
Overall, I’m pretty impressed with Assistive Access mode. If your loved one wants the smooth performance of an iPhone but –– for whatever reason –– would prefer to have a simplified layout, then Assistive Access seems like a great solution.
The buttons are large, navigation is intuitive, and all of these features are highly customizable. The only downside, as far as I can see, is that, as of now, only a handful of apps are compatible with Assistive Access mode. And while other apps may develop versions that work with this mode, for now, internet browsers and other apps will have to use their standard versions.
